> ## Documentation Index
> Fetch the complete documentation index at: https://docs.ironclaw.com/llms.txt
> Use this file to discover all available pages before exploring further.
# Google Compute Engine
> Host IronClaw on a Google Compute Engine VM
Google Compute Engine (GCE) lets you run virtual machines on Google's infrastructure with flexible pricing and a generous free tier. In this guide we will create a GCE VM instance and configure it securely so you can run IronClaw and expose only the endpoints you actually need.
Do not feel like setting up your own infrastructure? You can install IronClaw with a few clicks on [agent.near.ai](https://agent.near.ai)
***
## Create a Google Cloud Project
Sign in to [Google Cloud Console](https://console.cloud.google.com). If this is your first time, accept the Terms of Service when prompted.
In the top navigation bar, click the **project selector** (it shows the current project name or "Select a project") → **New Project**.
Fill in the project details:
* **Project name**: choose a descriptive name (e.g. `ironclaw`)
* **Organization**: leave as-is unless your account belongs to a Google Workspace org
* **Location**: leave as-is for personal accounts
Click **Create**. Google will take a few seconds to provision the project.
Once created, make sure the new project is **selected** in the project selector before continuing — all resources you create are scoped to the active project.
***
## Create a VM Instance
Navigate to **Compute Engine → VM instances**. If this is your first time using Compute Engine, you will be prompted to enable the Compute Engine API — click **Enable** and wait a moment.
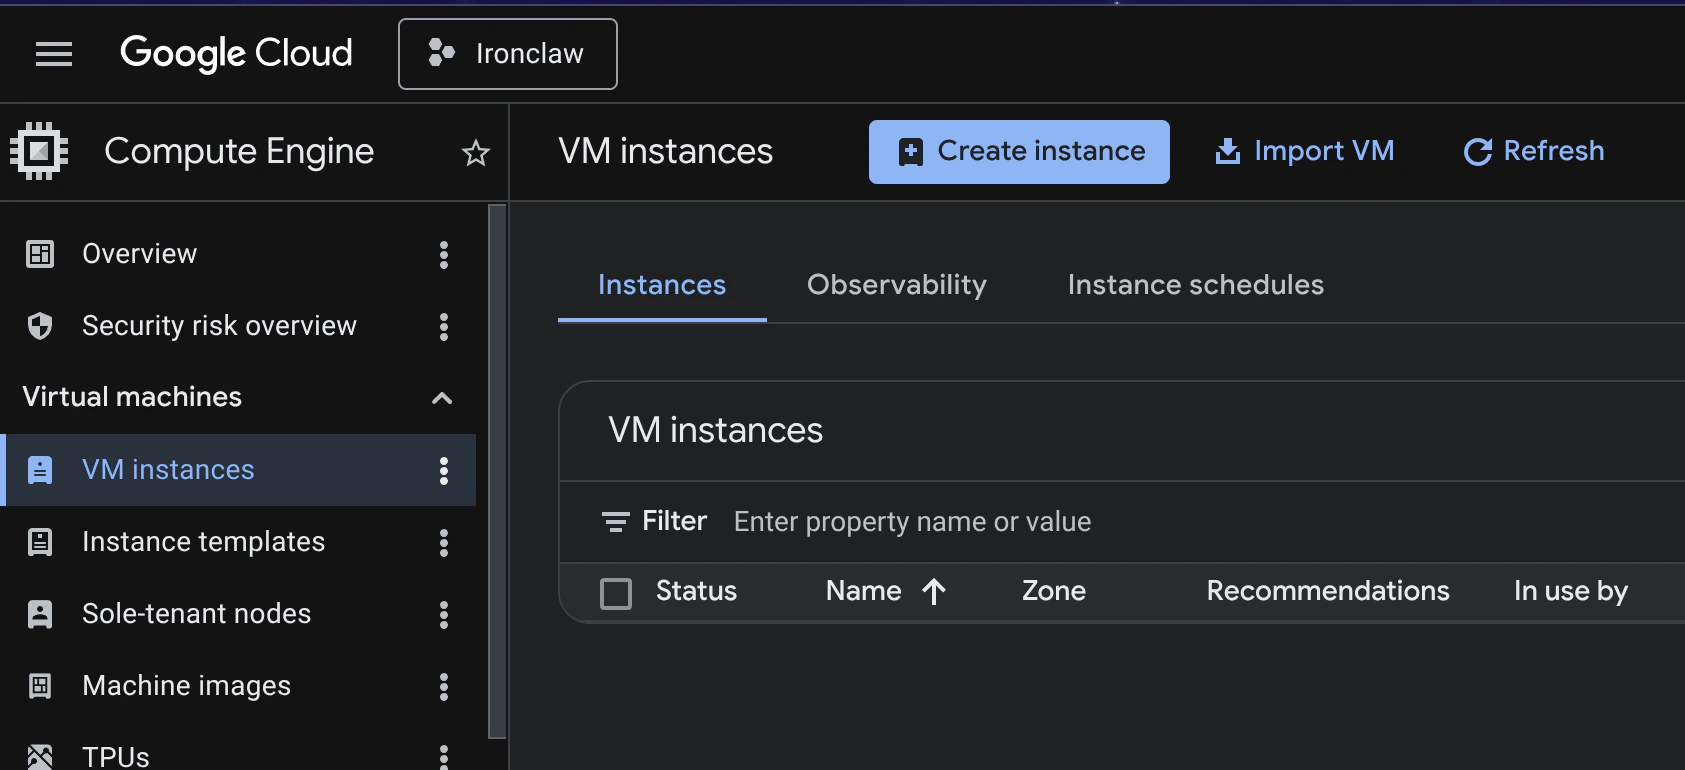 Click **Create Instance** and configure the following:
* **Name**: choose a descriptive name (e.g. `ironclaw`)
* **Region / Zone**: pick a region close to your users
* **Machine type**: `e2-micro` (free tier eligible) is sufficient for most use cases, or `e2-small` for more headroom
* **Boot disk**: Ubuntu 24.04 LTS, at least 10 GB
* **Firewall**: leave **Allow HTTP traffic** and **Allow HTTPS traffic** unchecked for now
You will add explicit firewall rules after the instance is created (see [Configure Firewall Rules](#configure-firewall-rules) below).
In the left sidebar, click **Security**. Scroll down to **VM access → Add manually generated SSH keys** and click **+ Add item**, then paste your public SSH key.
Click **Create Instance** and configure the following:
* **Name**: choose a descriptive name (e.g. `ironclaw`)
* **Region / Zone**: pick a region close to your users
* **Machine type**: `e2-micro` (free tier eligible) is sufficient for most use cases, or `e2-small` for more headroom
* **Boot disk**: Ubuntu 24.04 LTS, at least 10 GB
* **Firewall**: leave **Allow HTTP traffic** and **Allow HTTPS traffic** unchecked for now
You will add explicit firewall rules after the instance is created (see [Configure Firewall Rules](#configure-firewall-rules) below).
In the left sidebar, click **Security**. Scroll down to **VM access → Add manually generated SSH keys** and click **+ Add item**, then paste your public SSH key.
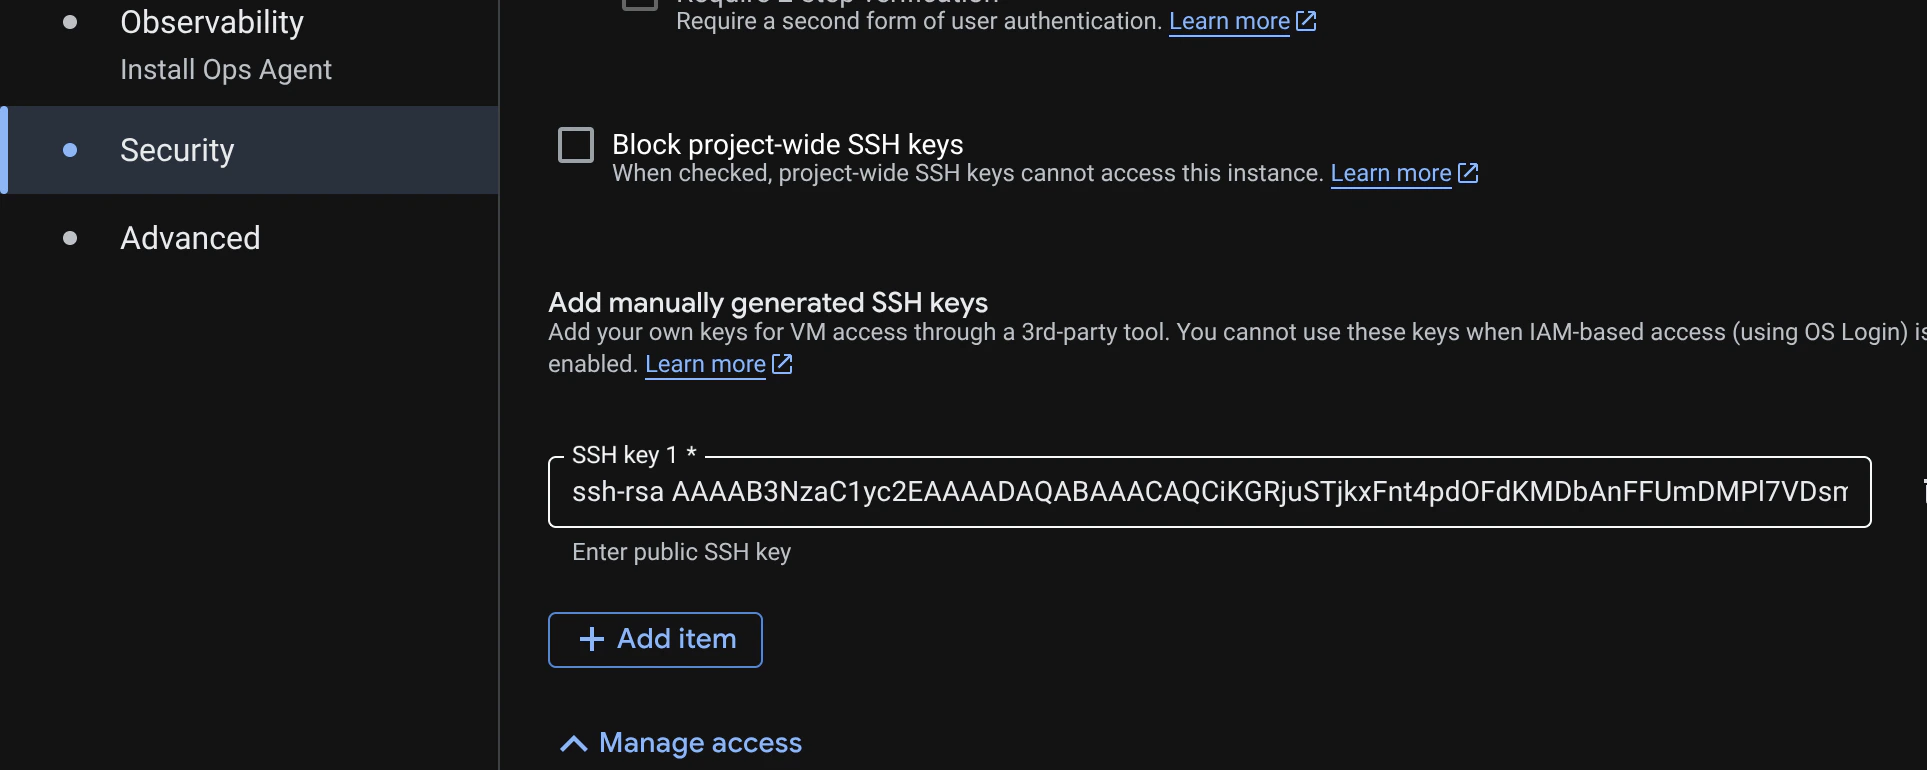 You can generate one locally:
```bash theme={null}
ssh-keygen -t ed25519 -C "your-email@example.com"
cat ~/.ssh/id_ed25519.pub # copy this value into the Console
```
The key should be in OpenSSH public key format: ` [comment]` (for example, `ssh-ed25519 AAAA... your-email@example.com`). GCE accepts multiple key types and adds the key to the instance automatically.
You could also log in with a password, but using SSH keys is more secure and recommended. Make sure to keep your private key safe and do not share it with anyone.
***
## Access Your Instance
Once the instance is running, find its **External IP** in the VM instances list.
You can generate one locally:
```bash theme={null}
ssh-keygen -t ed25519 -C "your-email@example.com"
cat ~/.ssh/id_ed25519.pub # copy this value into the Console
```
The key should be in OpenSSH public key format: ` [comment]` (for example, `ssh-ed25519 AAAA... your-email@example.com`). GCE accepts multiple key types and adds the key to the instance automatically.
You could also log in with a password, but using SSH keys is more secure and recommended. Make sure to keep your private key safe and do not share it with anyone.
***
## Access Your Instance
Once the instance is running, find its **External IP** in the VM instances list.
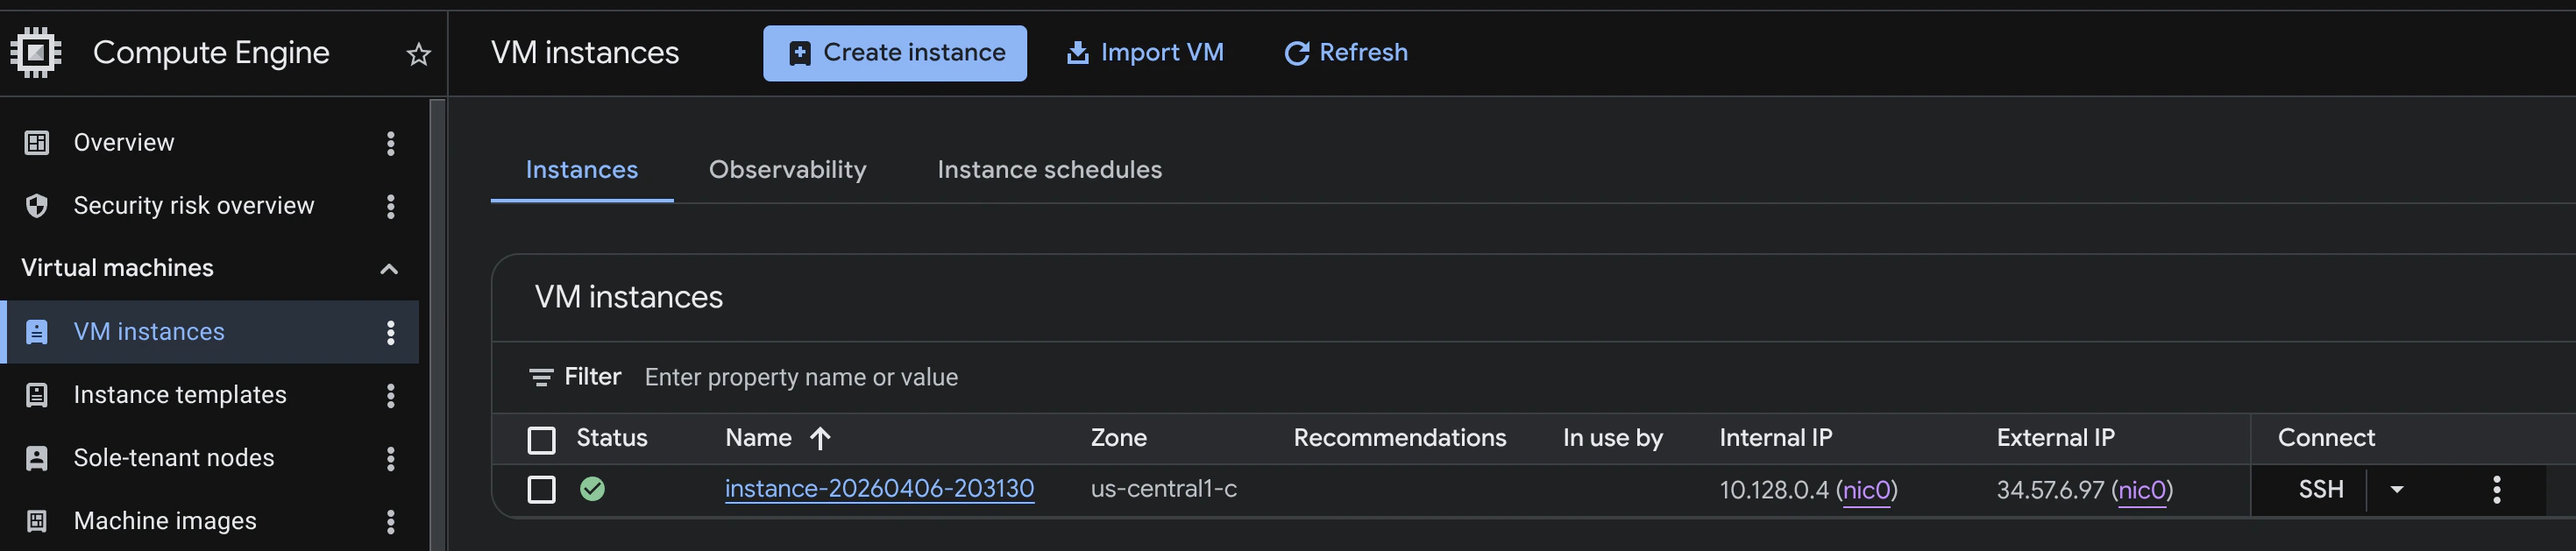 Click the **SSH** button next to the instance to open a browser-based terminal — no local setup needed.
To connect from your own terminal using the IP address:
```bash theme={null}
# Replace and accordingly
ssh @
```
***
## Configure Firewall Rules
IronClaw's Web Gateway defaults to `127.0.0.1:3000`, which means it is local-only by default and not directly reachable from the internet.
Recommended exposure model:
* Keep the Web Gateway bound to `127.0.0.1:3000`
* Expose public traffic with a reverse proxy on `80/443` that forwards to `127.0.0.1:3000`
* Or keep the gateway private and access it through SSH tunnel/VPN
Navigate to **VPC Network → Firewall** in the left sidebar and create rules based on your model.
Baseline rules (recommended for most setups):
| Rule name | Direction | Targets | Source IP ranges | Protocols / Ports |
| ---------------- | --------- | ------------- | --------------------------------------- | ----------------- |
| `allow-ssh-myip` | Ingress | All instances | Your public IP (e.g. `203.0.113.10/32`) | TCP 22 |
| `allow-webhook` | Ingress | All instances | `0.0.0.0/0` | TCP 8080 |
If you run a reverse proxy (recommended for public web access), also allow:
| Rule name | Direction | Targets | Source IP ranges | Protocols / Ports |
| ------------- | --------- | ------------- | ---------------- | ----------------- |
| `allow-http` | Ingress | All instances | `0.0.0.0/0` | TCP 80 |
| `allow-https` | Ingress | All instances | `0.0.0.0/0` | TCP 443 |
If you intentionally expose the gateway directly (generally not recommended), you must:
1. Set `GATEWAY_HOST=0.0.0.0` (and optionally `GATEWAY_PORT=` if not `3000`)
2. Set `GATEWAY_AUTH_TOKEN=`
3. Add a firewall rule for that gateway port, ideally restricted to trusted source IPs
With SSH tunnel or VPN access, keep `GATEWAY_HOST` at the default (`127.0.0.1`) and do not open the gateway port in GCE firewall.
Restricting SSH to your IP prevents brute-force attacks from the internet. You can update the source range later if your IP changes. Port `8080` is required for webhooks (e.g. Telegram) to deliver events to IronClaw. On Linux, the orchestrator internal API listens on port `50051` and binds to `0.0.0.0`; unless you add a firewall rule for it, GCE's default deny-all ingress policy will still block external access. Other IronClaw listeners bind to `127.0.0.1` by default.
***
## Secure Your Instance
Now that you have access to your VM, harden it before installing IronClaw.
### Update and Upgrade
Make sure the system is up to date:
```bash theme={null}
sudo apt update && sudo apt upgrade -y
```
### Create a New User
It is good practice to create a dedicated user with sudo privileges instead of relying on the default account. You can create a new user (for example, `ironclaw`) and add it to the sudo group:
```bash theme={null}
sudo adduser ironclaw
sudo usermod -aG sudo ironclaw
```
Copy your SSH key from the current user to the new one so you can log in:
```bash theme={null}
# Create the .ssh directory for the new user
sudo mkdir -p /home/ironclaw/.ssh
# Copy the authorized_keys from the current user
sudo cp ~/.ssh/authorized_keys /home/ironclaw/.ssh/authorized_keys
# Set the correct permissions (critical — SSH will ignore the file otherwise)
sudo chown -R ironclaw:ironclaw /home/ironclaw/
sudo chmod 700 /home/ironclaw/.ssh
sudo chmod 600 /home/ironclaw/.ssh/authorized_keys
```
Open a new terminal window and confirm you can log in before continuing:
```bash theme={null}
ssh ironclaw@
```
Do not move forward until you have confirmed that you can log in with the new user. If you lose access without another user set up, you will need to recreate the VM.
***
## Install IronClaw
With the server hardened, install IronClaw and start it up:
```bash theme={null}
curl --proto '=https' --tlsv1.2 -LsSf https://github.com/nearai/ironclaw/releases/latest/download/ironclaw-installer.sh | sh
```
Then start IronClaw and follow the prompts to complete the setup:
```bash theme={null}
ironclaw
```
We recommend using a session manager like `tmux` or `screen` so you can easily detach and reattach to your running IronClaw instance between SSH sessions.
***
## Next Steps
Follow our [Quickstart Guide](/quickstart) to create your first agent, connect it to Telegram, and start exploring IronClaw's capabilities.
Want to talk with your agent using a messaging app? Check out the [**Channels**](/channels/overview) documentation to learn how to connect.
Need your agent to perform complex tasks that require multiple tools? Check out the [**Extensions**](/extensions/overview) documentation.
Click the **SSH** button next to the instance to open a browser-based terminal — no local setup needed.
To connect from your own terminal using the IP address:
```bash theme={null}
# Replace and accordingly
ssh @
```
***
## Configure Firewall Rules
IronClaw's Web Gateway defaults to `127.0.0.1:3000`, which means it is local-only by default and not directly reachable from the internet.
Recommended exposure model:
* Keep the Web Gateway bound to `127.0.0.1:3000`
* Expose public traffic with a reverse proxy on `80/443` that forwards to `127.0.0.1:3000`
* Or keep the gateway private and access it through SSH tunnel/VPN
Navigate to **VPC Network → Firewall** in the left sidebar and create rules based on your model.
Baseline rules (recommended for most setups):
| Rule name | Direction | Targets | Source IP ranges | Protocols / Ports |
| ---------------- | --------- | ------------- | --------------------------------------- | ----------------- |
| `allow-ssh-myip` | Ingress | All instances | Your public IP (e.g. `203.0.113.10/32`) | TCP 22 |
| `allow-webhook` | Ingress | All instances | `0.0.0.0/0` | TCP 8080 |
If you run a reverse proxy (recommended for public web access), also allow:
| Rule name | Direction | Targets | Source IP ranges | Protocols / Ports |
| ------------- | --------- | ------------- | ---------------- | ----------------- |
| `allow-http` | Ingress | All instances | `0.0.0.0/0` | TCP 80 |
| `allow-https` | Ingress | All instances | `0.0.0.0/0` | TCP 443 |
If you intentionally expose the gateway directly (generally not recommended), you must:
1. Set `GATEWAY_HOST=0.0.0.0` (and optionally `GATEWAY_PORT=` if not `3000`)
2. Set `GATEWAY_AUTH_TOKEN=`
3. Add a firewall rule for that gateway port, ideally restricted to trusted source IPs
With SSH tunnel or VPN access, keep `GATEWAY_HOST` at the default (`127.0.0.1`) and do not open the gateway port in GCE firewall.
Restricting SSH to your IP prevents brute-force attacks from the internet. You can update the source range later if your IP changes. Port `8080` is required for webhooks (e.g. Telegram) to deliver events to IronClaw. On Linux, the orchestrator internal API listens on port `50051` and binds to `0.0.0.0`; unless you add a firewall rule for it, GCE's default deny-all ingress policy will still block external access. Other IronClaw listeners bind to `127.0.0.1` by default.
***
## Secure Your Instance
Now that you have access to your VM, harden it before installing IronClaw.
### Update and Upgrade
Make sure the system is up to date:
```bash theme={null}
sudo apt update && sudo apt upgrade -y
```
### Create a New User
It is good practice to create a dedicated user with sudo privileges instead of relying on the default account. You can create a new user (for example, `ironclaw`) and add it to the sudo group:
```bash theme={null}
sudo adduser ironclaw
sudo usermod -aG sudo ironclaw
```
Copy your SSH key from the current user to the new one so you can log in:
```bash theme={null}
# Create the .ssh directory for the new user
sudo mkdir -p /home/ironclaw/.ssh
# Copy the authorized_keys from the current user
sudo cp ~/.ssh/authorized_keys /home/ironclaw/.ssh/authorized_keys
# Set the correct permissions (critical — SSH will ignore the file otherwise)
sudo chown -R ironclaw:ironclaw /home/ironclaw/
sudo chmod 700 /home/ironclaw/.ssh
sudo chmod 600 /home/ironclaw/.ssh/authorized_keys
```
Open a new terminal window and confirm you can log in before continuing:
```bash theme={null}
ssh ironclaw@
```
Do not move forward until you have confirmed that you can log in with the new user. If you lose access without another user set up, you will need to recreate the VM.
***
## Install IronClaw
With the server hardened, install IronClaw and start it up:
```bash theme={null}
curl --proto '=https' --tlsv1.2 -LsSf https://github.com/nearai/ironclaw/releases/latest/download/ironclaw-installer.sh | sh
```
Then start IronClaw and follow the prompts to complete the setup:
```bash theme={null}
ironclaw
```
We recommend using a session manager like `tmux` or `screen` so you can easily detach and reattach to your running IronClaw instance between SSH sessions.
***
## Next Steps
Follow our [Quickstart Guide](/quickstart) to create your first agent, connect it to Telegram, and start exploring IronClaw's capabilities.
Want to talk with your agent using a messaging app? Check out the [**Channels**](/channels/overview) documentation to learn how to connect.
Need your agent to perform complex tasks that require multiple tools? Check out the [**Extensions**](/extensions/overview) documentation.